A weeks back I bought the course at makereactapps.com to get a bit more into building React Apps from scratch. I really loved the course, as you end up having a lot of sample projects (who you could add to your portfolio right away). I also like it because it’s a really practical approach to get into developing React without being shocked by too much theoretical concepts. So, I decided to recap some of the things I learnt during the course
… to set up VSCode for developing React appas
Having an IDE, which allows you to code faster than using a normal text editor gets always more important. Visual Studio Code has been getting way more important, to be one of the most used Editors for Javascript, during the initial steps of the course, Chris gets you started with VSCode and npm/yarn.
One of the big advantages of Visual Studio Code is, that everyone is able to customize it to support their own need. I ended up setting up IDE for developing React the following way:
Themes and Styling

To style up VSCode to my own needs I am using the following extensions:
- Peacock: This extension allows you to change the color of your VSCode workspace. I used it to add an alternative color to the of the multiple bars in VSCode. There’s a good option to use this when you are using multiple workspace, and assigning a different color to every workspace. My current color is yellow (#f9e64f). Link:
- Palenight Theme: Currently I am using this dark theme in my VSCode. I like because it’s so clean and really relaxing: https://marketplace.visualstudio.com/items?itemName=whizkydee.material-palenight-theme
- Fira Code Font: I am using this Font (and I am probably not the only one) as it’s clean and simple as well, but the main purpose it has support for ligatures. See here: https://github.com/tonsky/FiraCode
Extensions
- vscode-icons: Adding icons to your Code-Browser adds a lot of readability, especially when you got a lot of different files. Link: https://marketplace.visualstudio.com/items?itemName=vscode-icons-team.vscode-icons
- Turbo Console Log: This extension adds a shortcut (Ctrl + Alt + L) to quickly adds a console.log(x) statement to your code (You can do that for multiple variables on your code too, by just selecting different variables). Link: https://marketplace.visualstudio.com/items?itemName=ChakrounAnas.turbo-console-log
- Simple React Snippets: Adds a lot of snippets to reduce typing and improve your development speed for React. Examples are like imr for Import React, imrc for Import React /useState. Link: https://marketplace.visualstudio.com/items?itemName=burkeholland.simple-react-snippets
- Pretttier: I am using the prettier extension to automatically format any files on save. Link: https://marketplace.visualstudio.com/items?itemName=esbenp.prettier-vscode
- Path Intellisense: As it’s already written in the name, it adds a better logic to your path suggestions available in VSCode: https://marketplace.visualstudio.com/items?itemName=christian-kohler.path-intellisense
- ESLint: Adding the ESLint functionality to VSCode and gives you hints about potentail Issues in your code. Link: https://marketplace.visualstudio.com/items?itemName=dbaeumer.vscode-eslint
- Gitlens: This Extension gives you a GIT integration on stereoids. Link: https://marketplace.visualstudio.com/items?itemName=eamodio.gitlens
- Import Cost: This extension calculates the import cost to your project by every imported package: https://marketplace.visualstudio.com/items?itemName=wix.vscode-import-cost
- Yarn: By installing this extension you can run yarn commands directly from VSCode without the need to dig into a terminal. If you are using a macbook with a touchbar, this extension give you the option to run commands to them directly using your touchbar: https://marketplace.visualstudio.com/items?itemName=gamunu.vscode-yarn
- Markdown Preview Advanced: You want to update your README.md, so that your Repository looks beautiful? To do that locally I am using the following extension to write markdown files: https://marketplace.visualstudio.com/items?itemName=shd101wyy.markdown-preview-enhanced
Visual Studio Code has also a great support for containers. For example, it’s really easy to setup all your Docker Containers with it. You can also run VSCode on a remote machine (or on your WSL).
See here for more information: https://marketplace.visualstudio.com/items?itemName=ms-vscode-remote.vscode-remote-extensionpack
Have you know you can sync your VSCode settings between multiple machines? See here, you actually just need a GitHub or Microsoft account
User Snippets
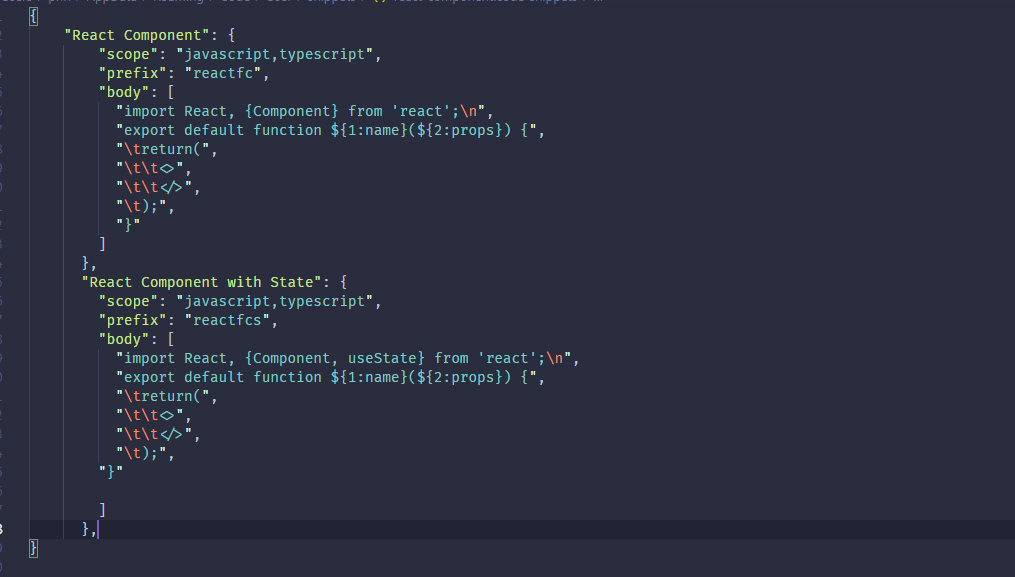
I didn’t know much about the possibility about custom snippets in VSCode before going through this course. Personally, I think that custom snippets can improve your coding speed a lot so I was kind of amazed of the potential in doing your own snippetsm but how can we create one?
- Type in “Ctrl + Shift + P” to open the command palette
- Search for “Preferences: User Snippets”
- Add a new global snippet
- Enter the name
And now you’re ready to go – VSCode will just provide you with an example of an console.log snippet in the comments.
To speed up the creation of React components I have decided to create the following snippet, to not be needing to type it in each time and save a lot of time:
… to add hooks to the components
Since 2019 or React v16.8 hooks have been added to React, which allows us to use State without writing a class.
What is a Hook? A Hook is a special function that lets you “hook into” React features. For example,
useStateis a Hook that lets you add React state to function components. We’ll learn other Hooks later.
Adding the useState hook to an React Component is pretty easy and can be done with the following code:
import React, { useState } from 'react';

function Example() {
  // Declare a new state variable, which we'll call "count"
  const [count, setCount] = useState(0);
...
The only parameter we are passing to the function is the initial value of the state.
When trying to run the setState in a loop, React will capture the run on the first time and sometime not re-render the page on any run in the future. To avoid that, a callback can be passed to the setCount function above:
setCounter((counter) => {
   counter + 1;
});
Array destructing: useState return an array with two elements, by using [count, setCount] we are destructing that returned array and are creating to new variables (which we can name as we want)
… to use conditional Rendering in JSX
The first time I was looking at inline If-Else Rendering in JSX I was really confused, especially when I wasn’t too familier with the inline conditional operator in Javascript.
In React you could always use “normal” If-Else statements, but using inline always looks a bit cleaner, if you ask me. So, to use different buttons based on a variable you can use this instead:
{ isRunning ?
<button onClick={stopTimer}>Stop</button>
:
<button onClick={startTimer}>Start</button>
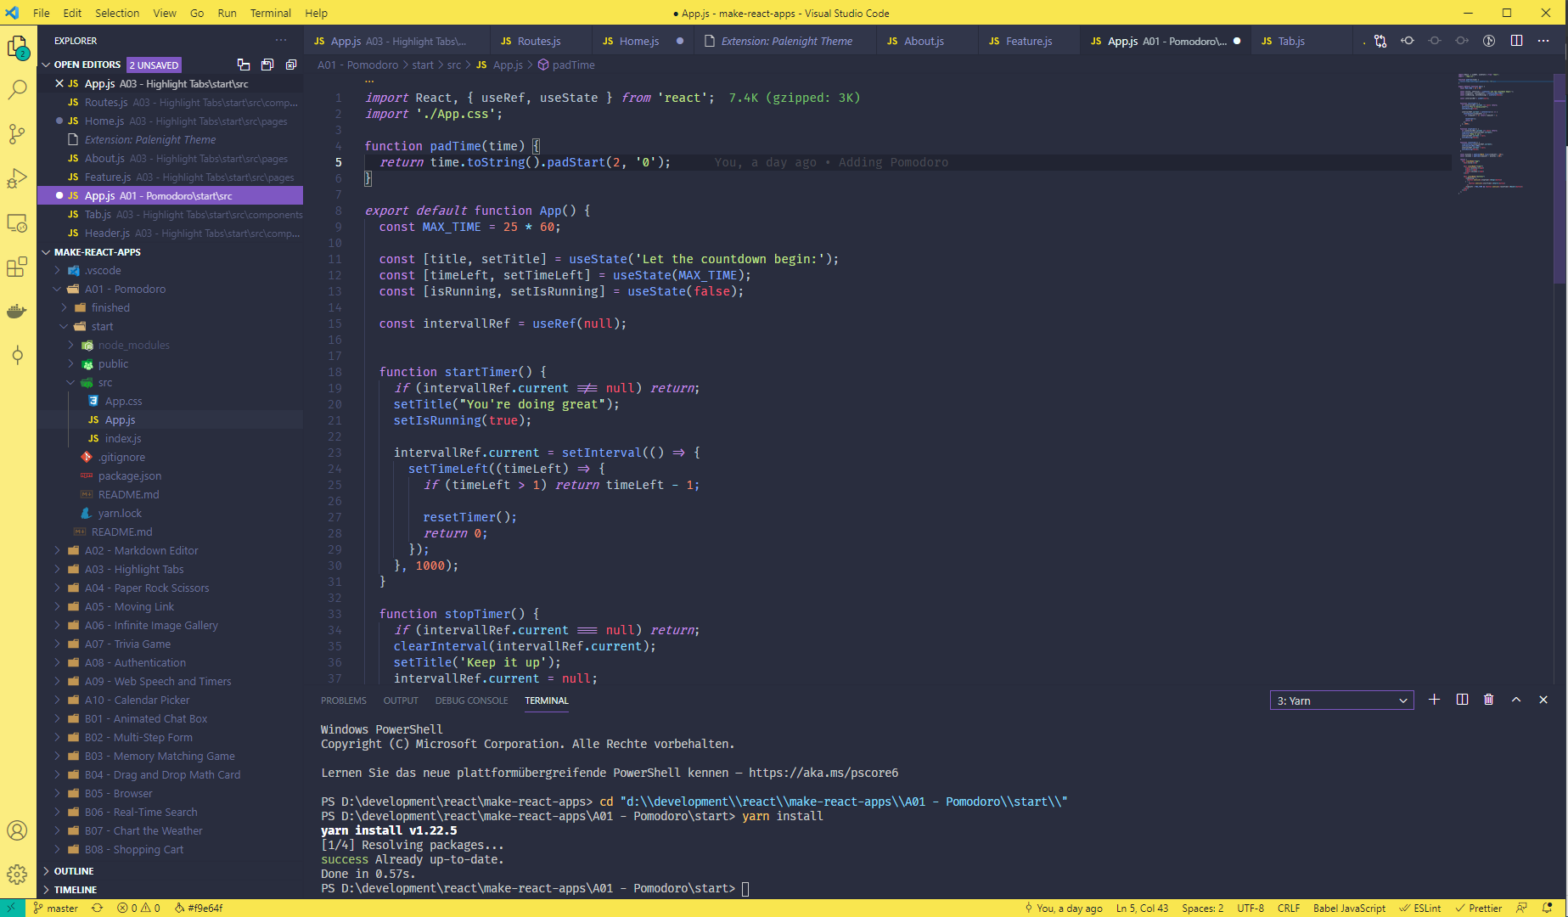
}… to use padStart
padStart and padEnd are great functions to use when trying to display numbers as strings in a certain format. Minutes and seconds are great example of that.
Soo for example if you want to have the minutes to be always have two digit format (with a leading 0 when the numbers is below 10) you’d need something like that:
minutes.toString().padStart(2, '0')In this example if the String is only character a trailing zero is added. Another great example (over at MDN) is to replace the trailing numbers of a credit card with stars. To achieve that we need to slice everthing the last 4 digits pad the starts to the beginning at the string:
const supernotsecret = '2034399002125581';
const last4Digits = fullNumber.slice(-4);
const maskedNumber = last4Digits.padStart(fullNumber.length, '*');
… to use setInterval
setIntervall is a javascript function that calls a certain fucntion at specified intervals (in miliseconds). So the following example would increase the counter every second (or 1000 miliseconds):
const counter = 0
const interval = setInterval(
() => {
	counter++;
}
, 1000
);
On the statement above the counter would increase forever, to stop it after sometime we could need to call the clearInterval function like below:
clearInterval(interval);… to persist values with useRef
To be actually be able to save the interval’s state in the example above, we would need to save it using useRef.
Creating a useRef object would be done the following way:
const intervallRef = useRef(null);
intervallRef.current = setInterval(() => {
      console.log("Hi, I am in an interval
}, 1000);
… to add routing to my app
There’s a lot of options to use Routing in React, one of them is react-router-dom. One of the benefits of react-router is that it supports react-native as well. To get started with it after installing it with yarn or npm you’d need to import the following Stuff:
- BrowserRouter as Router: This element will needs to placed around everything that will be used for the Routing (the Links as well as the Conent), so it’s mostly being added add top level
- Route: With Route we can define which object should be displayed as conent on which Route. Hint: If we are using the “/” Route, it is important to add
exact={true}or add it add latest route otherwise the default route would be showed. - Switch: The switch component makes sure that only the first Route that matches the patch will be displayed. If you have always displayed the “/” Route, make sure you add
exact={true}to add the Route definition - Link or NavLink: Link and NavLink are Link-Component (<a> in HTML), to support the Router. The difference between these two is that on NavLink styling attributes are added to when the Link matches the current page.
… to use Events in React
To get started React Events can be defined Really easy, just see the example below:
<button onClick={stopTimer}>Stop</buttonSome things to keep in mind:
- React Events are always written in CamelCase
- You only need to pass the name of the function
- Inline Functions are also possible:
onClick={() => handleClick()} - To prevent default behaviour of an HTML element we need to call
e.preventDefault()
… to select an random element in an Array
If you want to pick a random element in an array you can do the following:
const randomChoice = choices[Math.floor(Math.random() * choices.length)]But what does this actually do? Let’s try to split the stuff in the respective parts:
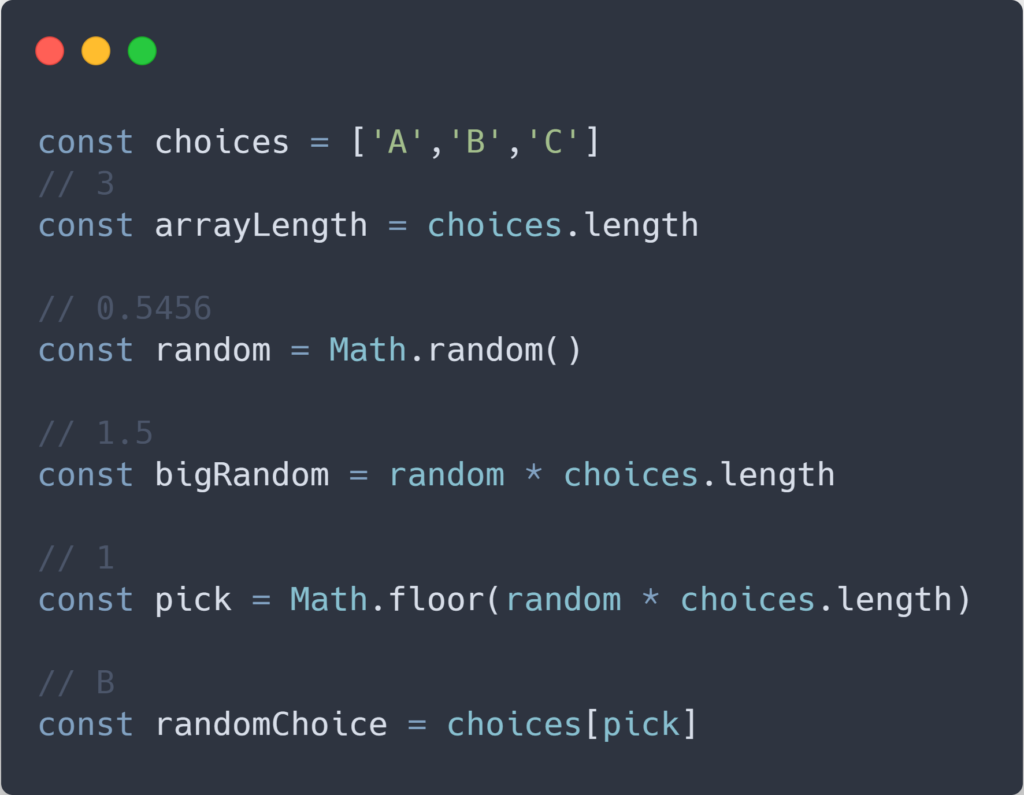
In the example above we have a three elements in our array, which gives us the lenth of 3 and the indices of 0,1,2 to access to elements.
To pick a random number in JS we can use Math.random, but that gives us only a random number between 0 and 1 – but not 1. To actually have one random numbers between 0 and the desired number instead of 1, we’d just need to multiple it with the top value we want. In our case that would be array.lenth.
As a last step we need to pick our indices from our random numbers. We can’t do that with a number like 2.7. To do that we use Math.floor which returns the largest integer less or equal the given number. This works perfectly because the array indices start at zero and not at one. Because Math.random will never return 1 we will get the possible values of 0, 1 and 2
… to loop over a map
Looping over a map in javascript could be done via multiple ways: sequentials loop, foreach loop, for i in array. But for now I am going to go with the fuctional approach of array.map():
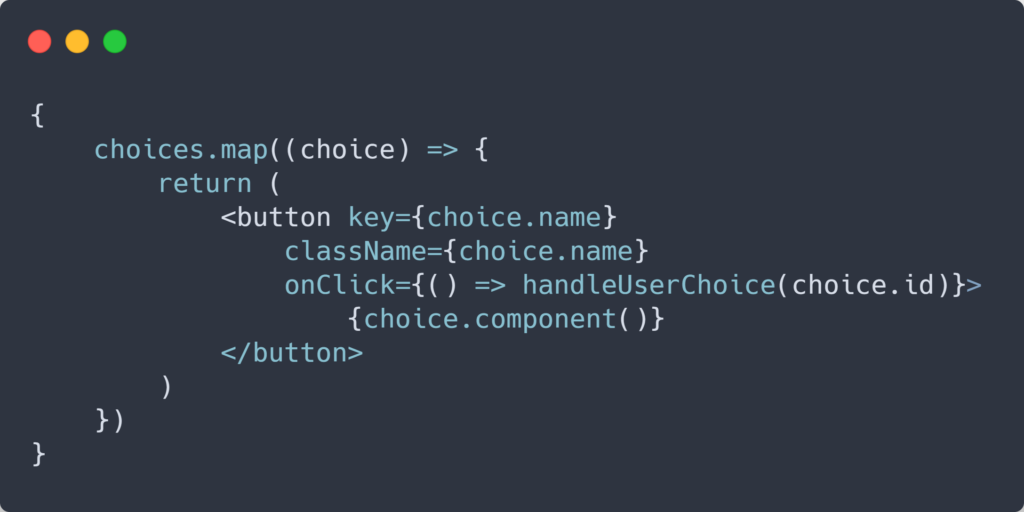
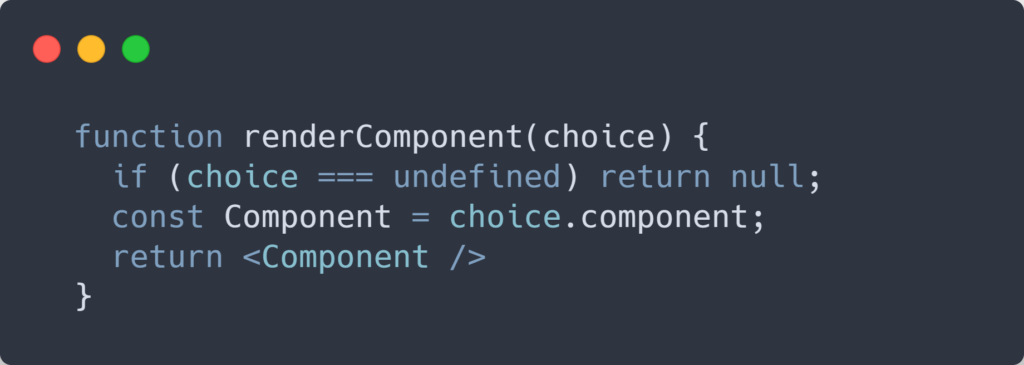
… to display a component references from State:
Sometimes you would like, to reference a component in a state object and dynamically display a component when certain conditions are met – A great way to to this is to a a function like this to your code:
… to consume external APIs
There’s a lot of possibilites and methods to consume external (REST) APIs in React. One of the ways to tod AJAX Calls is using the browser-builtin window.fetch:
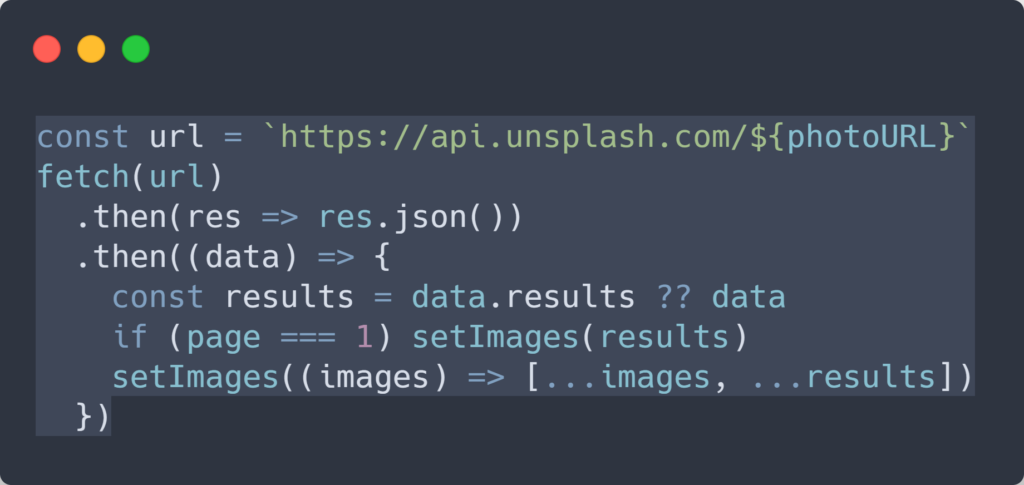
The Fetch API will return a promise, what then can used to to query the returned data. The first then-statement would extract the actual returned data from the Response-Object and the second would define how we would like to store the retrieved data.
What are Promises? Promises are way to handle asynchrous code, they are like “a proxy that will eventually become available”. So, a promise, when initialized has the status pending. In the future their state will turn into resolved (on success) or rejected (on a error).
… to use environment variables in React
Some times we can to use information in our code, that is (kind of) secret. To not store those information inside a GIT repository, we can add those information in environment variables and access them during runtime.
By default – In React all environment variables with a prefix of REACT_APP_ are added automatically. Enviroment variables can be set using the command line (or many SaaS services, like Heroku and Vercel offer the option to define the Variables in the project settings).
A much nicer approach is to define a file called .env where’d actually store it – just make sure you don’t add this file to the repository (duh)
To later access those variables you’d need just to add following line to your code:
const accessKey = process.env.REACT_APP_UNSPLASH_ACCESS_KEY… to use the Web Speech API
The Web Speech API is an (experimental) technology which allows you to to Text-to-Speech and Speech recognition is your supported browser. Downside? At the moment it’s only supported by Chromium Browsers
To not be needing to worry about all the stuff about Web Speech API you can use the following react hook to use Web Speech API in your React Application: https://github.com/MikeyParton/react-speech-kit
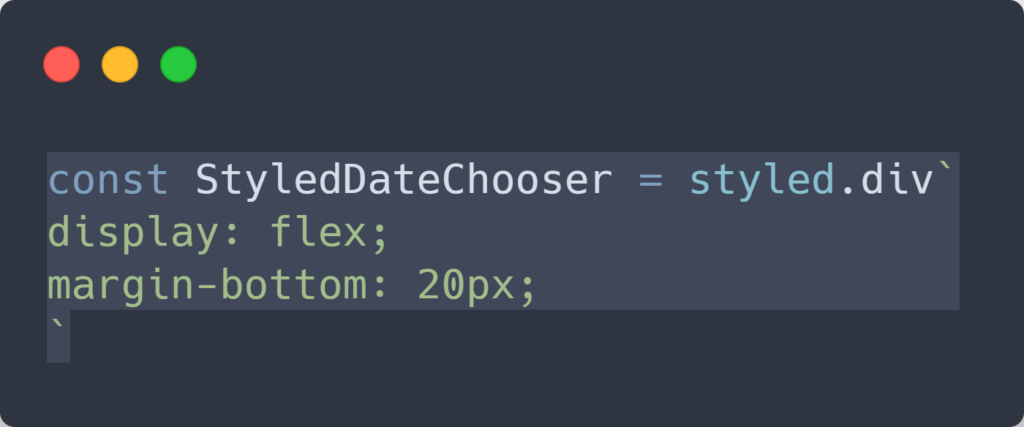
… to use styled components
I have used Styled Components before, infact most of the styling of this site has been done using emotion which is a similar approach. In short words you basically just define certain styling for your components
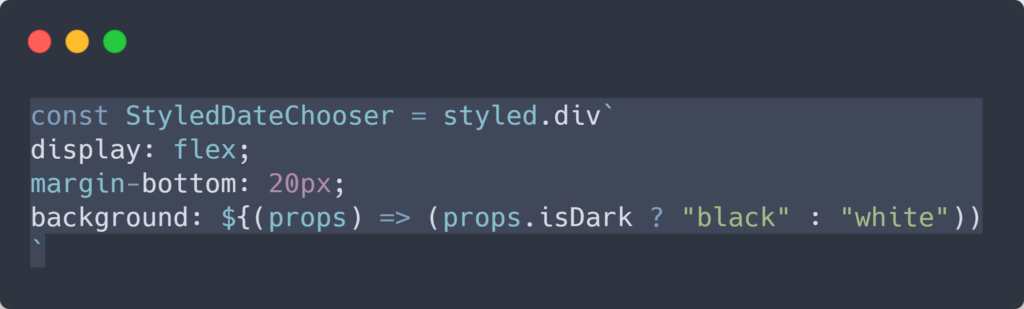
Additionally, to add some conditional rendering there’s also to access the props of your components like that:
… to use useEffect and useCallback hooks
The useEffect hook in react let’s you perform side effects in Components:
useEffect(() => {
    document.title = `You clicked ${count} times`;
});
The function that is passed do the useEffect, will be remembered by React and will be performed after any DOM updates will be performed. So by default an useEffect will be called after every render of the page, performance wise this could be really bad – that’s why the useEffect accepts a second (and optional) parameter to passed by:
It’s an array which determines when the useEffect should be called. Not on any render, only when one of the elements in the array changes the useEffect-Hook will be called:
useEffect(() => {
  document.title = `You clicked ${count} times`;
}, [count]); // Only re-run the effect if count changes
If we decide to pass an empty array ([ ]), we make sure the the useEffect will only run one time – after the initial load of the DOM.
Because React tries to be as performant as possible, it will notify us as soon one element is added to the dependencies array, that the useEffect is having other dependencies which aren’t still part of the array.
Because we can define in which scenarios the useEffect will be called, we can now add multiple useEffect hooks for each case. One of the additional use cases of using is to update a secondary state if a first state get’s updated
If these are functions or even useState constants, adding them to the dependency array of the useEffect hook, can have the effect that the useEffect is called way to many times. That’s because those functions might be pointers and each time, they’re recreated React will think that their value changed.
To avoid this, another Hook can be used: useCallback
useCallback allows to create a memoized callback/function – where we can determine that this function will not change unless some dependecies (again specified with the corresponding depencies array):
const memoizedCallback = useCallback(
() => {
    doSomething(a, b);
  },
  [a, b],
);
So, in the example above, instead of using the doSomething function, we would use the momoizedCallback in the useEffect.
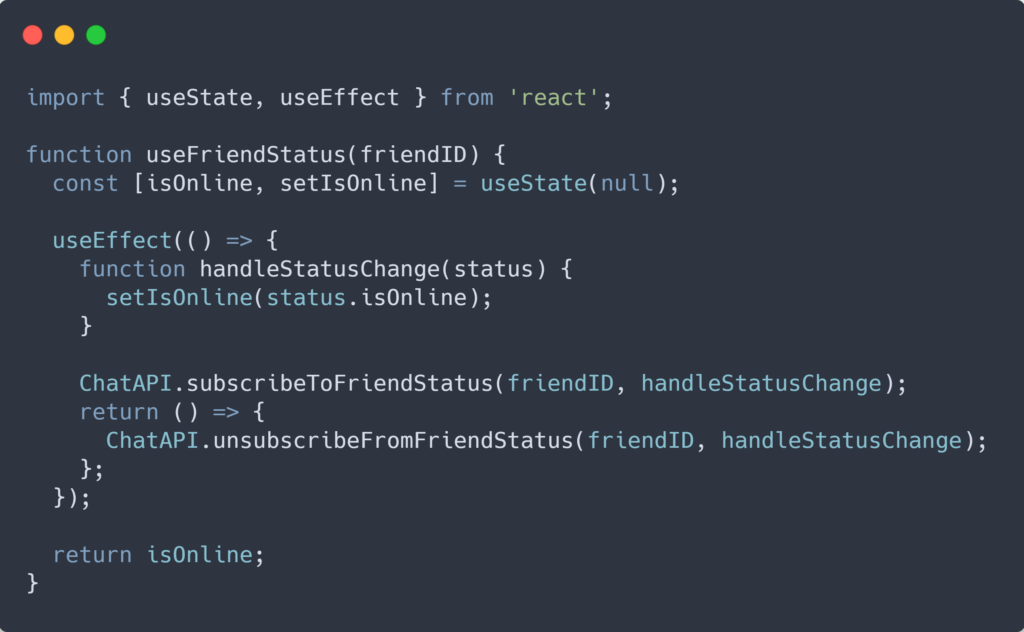
… to use custom hooks
As written before Hooks are a rather new concept in React, using them can make a component have a lot of lines of code. To extract some parts of it you can create a custom of and use it in your components like this:
const ownHook = useSuperOwnHook("hello");
A custom Hook is a JavaScript function whose name starts with “
https://reactjs.org/docs/hooks-custom.htmluse” and that may call other Hooks.
The definition of a custom hook would look like this:
… to use Context in React
When using the useState hooks in React it can get a bit messy inside the components when we have a lot of different state we want to save. Also we always need to pass some constants using paramaters to all the components used in the parent component.
So for example, instead of passing through a locale, a color palette or cache data to every single sub component we can create a context: Using the Context API we can make certain information automatically available for all the components that are wrapped in a parent component.
To use the Context API in React we will need to create two things: the Conext Hook and the ContextProvider
import React, { createContext, useState, useEffect, useContext } from 'react';
export const CustomContext = createContext();
export const useMyCustomContext = () => useCustomContext(Auth0Context);
    return <CustomContext.Provider value={{
        isAuthenticated,
        user,
        isLoading,
        login: (...parameters) => auth0Client.loginWithRedirect(...parameters),
        logout: (...parameters) => auth0Client.logout(...parameters),
        getToken: (...parameters) => auth0Client.getTokenSilently(...parameters)

    }}>
        {children}
    </Auth0Context.Provider>
The Provider will be later used to wrap all the elements/components where we’d like to have our data available. Normally that would be at a top level.
With the Context Hook, we can later on access the constants directly from the components:
const { login, logout, isAuthenticated, user } = useCustomContext();
All the projects, I have gone through while doing the course can be found here on the forked repository.